Centos Virtual LAMP server -- Part II
*Part 1 of this series is here*
Unix people are probably familiar with the father of the DNS system -- the /etc/hosts file. The hosts file has a simple format:
ipaddress hostname
In the days prior to DNS, people would update a master hosts file and copy it around to all the servers in the enterprise. Surprisingly Windows versions also support this file, as a way of overriding DNS, so we can use this to our advantage, by adding an entry for our development server. In this example, I'm going to use dev.gizmola.com, which is not a real server.
One important reason to do this is that Apache and other web servers, use a feature of HTTP 1.1 that specifies a header field named "Host:". This mechanism facilitates the service of multiple domains from a single apache server, through the configuration of apache virtual host (or vhost) entires. The server uses the Host name in the HTTP header to determine how to route requests, so without host name resolution. you have to use non-standard ports and other mechanisms that are more trouble than they're worth. a
Customizing your LAMP server
Unix people are probably familiar with the father of the DNS system -- the /etc/hosts file. The hosts file has a simple format:
ipaddress hostname
In the days prior to DNS, people would update a master hosts file and copy it around to all the servers in the enterprise. Surprisingly Windows versions also support this file, as a way of overriding DNS, so we can use this to our advantage, by adding an entry for our development server. In this example, I'm going to use dev.gizmola.com, which is not a real server.
One important reason to do this is that Apache and other web servers, use a feature of HTTP 1.1 that specifies a header field named "Host:". This mechanism facilitates the service of multiple domains from a single apache server, through the configuration of apache virtual host (or vhost) entires. The server uses the Host name in the HTTP header to determine how to route requests, so without host name resolution. you have to use non-standard ports and other mechanisms that are more trouble than they're worth. a
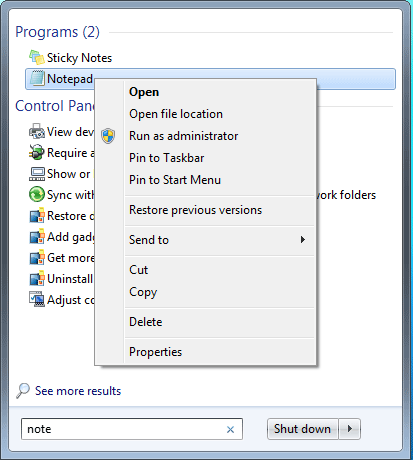
To establish DNS resolution for your workstation, you simply need to add entries to the hosts file. On linux and OS X, this is in /etc/hosts. On windows XP this file is in the /WINDOWS/system32/drivers/etc directory. This also works for Vista and Windows 7, however you have to open the file as an administrator. The easiest way to do this is to is to search for notepad, and then right click on it and choose "Run as Administrator". Locate the file and edit it to add entries for any vhosts you want to configure for development.

RHEL is very conservative in the way it handles package management, and often core packages lag far behind the latest releases. Fortunately, there are alternative repositories which provide updated versions of the LAMP stack, as well as support for commonly used php extensions that don't exist in the official RHEL repositories.
I recommend the use of Remi's Repository. Remi in turn depends on Fedora's "Extra Packages for Enterprise Linux (EPEL)" repository. Full instructions for configuration is provided at Remi's site, however, I've provided the steps to use for Centos/RHEL version 5, which is what I'm using in this series.
First we'll install support for EPEL using rpm.
rpm -Uvh http://download.fedora.redhat.com/pub/epel/5/i386/epel-release-5-3.noarch.rpm
The best way to handle this is to place the remi repo repository in the /etc/yum.repos.d directory. This will then allow us to refer to it when we want to install the updated packages we want.
su -
cd /etc/yum.repos.d
wget http://rpms.famillecollet.com/remi-enterprise.repo
Now you should be able to use the remi repo via yum, by specifying the "--enablerepo=" switch.
Remember to execute this steps as root.
First install the mysql-server.
yum --enablerepo=remi install mysql-server
Start the server to initialize it, and give the root account a password before you forget about it.
service mysqld start
mysqladmin -u root -h localhost password 'your password'
yum --enablerepo=remi install httpd
Now install php and related packages. This may vary depending on what you're doing. I've listed packages I find to be commonly useful.
yum --enablerepo=remi install php php-mysql php-gd php-pear php-mcrypt php-mbstring php-pecl-xdebug
Now you should be able to verify your version of php, using "php -v".
php -v
PHP 5.3.1 (cli) (built: Nov 20 2009 18:18:28)
Copyright (c) 1997-2009 The PHP Group
Zend Engine v2.3.0, Copyright (c) 1998-2009 Zend Technologies
with Xdebug v2.0.5, Copyright (c) 2002-2008, by Derick Rethans
Open up your apache configuration file for editing and move to the bottom of the file and uncomment the NameVirtualHost line:
# Use name-based virtual hosting.
#
NameVirtualHost *:80
Then add a vhost section for your virtual server. You can add as many of these as you like for development purposes. Read the Apache manual if you have any questions about any of these directives. We'll call this server dev1.gizmola.com.
<VirtualHost *:80>
ServerAdmin webmaster@gizmola.com
ServerName tm.gizmola.com
DocumentRoot /var/dev1
ErrorLog logs/dev1-error_log
CustomLog logs/dev1-access_log combined
<Directory /var/dev1>
Options FollowSymLinks
AllowOverride All
</Directory>
</VirtualHost>
You'll need to create the directory where your site will live and set permissions. As this is a development server you don't need to be overly concerned, but it's a good practice to get into to setup a user and group to own the webspace for each virtual host. You can then use your ftp client or scp as the user, in the same way you would for a production or shared hosting server to update the files as you develop your website.
groupadd dev1user
useradd -g dev1user dev1user
passwd dev1user
mkdir /var/dev1
chown -R dev1user:dev1user /var/dev1
Anytime you make a change to the apache configuration files, or the php.ini file, you need to restart apache.
Make sure that you've installed a hosts file entry for your new vhost as described previously.
# Copyright (c) 1993-2006 Microsoft Corp.
#
# This is a sample HOSTS file used by Microsoft TCP/IP for Windows.
#
# This file contains the mappings of IP addresses to host names. Each
# entry should be kept on an individual line. The IP address should
# be placed in the first column followed by the corresponding host name.
# The IP address and the host name should be separated by at least one
# space.
#
# Additionally, comments (such as these) may be inserted on individual
# lines or following the machine name denoted by a '#' symbol.
#
# For example:
#
# 102.54.94.97 rhino.acme.com # source server
# 38.25.63.10 x.acme.com # x client host
127.0.0.1 localhost
::1 localhost
10.1.0.4 dev1.gizmola.com
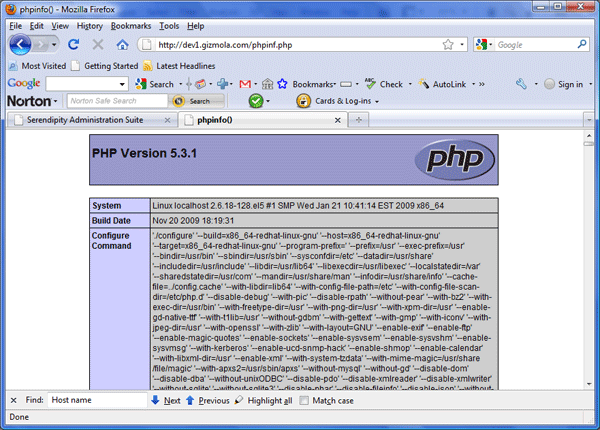
If all works as planned, the vhost should now answer. Put a phpinfo file (see Part 1 of this series) and point the browser to it to verify everything is working as planned.


Updating your MySQL and PHP using an alternative Yum Repo
RHEL is very conservative in the way it handles package management, and often core packages lag far behind the latest releases. Fortunately, there are alternative repositories which provide updated versions of the LAMP stack, as well as support for commonly used php extensions that don't exist in the official RHEL repositories.
I recommend the use of Remi's Repository. Remi in turn depends on Fedora's "Extra Packages for Enterprise Linux (EPEL)" repository. Full instructions for configuration is provided at Remi's site, however, I've provided the steps to use for Centos/RHEL version 5, which is what I'm using in this series.
First we'll install support for EPEL using rpm.
rpm -Uvh http://download.fedora.redhat.com/pub/epel/5/i386/epel-release-5-3.noarch.rpm
The best way to handle this is to place the remi repo repository in the /etc/yum.repos.d directory. This will then allow us to refer to it when we want to install the updated packages we want.
su -
cd /etc/yum.repos.d
wget http://rpms.famillecollet.com/remi-enterprise.repo
Now you should be able to use the remi repo via yum, by specifying the "--enablerepo=" switch.
Remember to execute this steps as root.
First install the mysql-server.
yum --enablerepo=remi install mysql-server
Start the server to initialize it, and give the root account a password before you forget about it.
service mysqld start
mysqladmin -u root -h localhost password 'your password'
yum --enablerepo=remi install httpd
Now install php and related packages. This may vary depending on what you're doing. I've listed packages I find to be commonly useful.
yum --enablerepo=remi install php php-mysql php-gd php-pear php-mcrypt php-mbstring php-pecl-xdebug
Now you should be able to verify your version of php, using "php -v".
php -v
PHP 5.3.1 (cli) (built: Nov 20 2009 18:18:28)
Copyright (c) 1997-2009 The PHP Group
Zend Engine v2.3.0, Copyright (c) 1998-2009 Zend Technologies
with Xdebug v2.0.5, Copyright (c) 2002-2008, by Derick Rethans
Adding a virtual host.
Open up your apache configuration file for editing and move to the bottom of the file and uncomment the NameVirtualHost line:
# Use name-based virtual hosting.
#
NameVirtualHost *:80
Then add a vhost section for your virtual server. You can add as many of these as you like for development purposes. Read the Apache manual if you have any questions about any of these directives. We'll call this server dev1.gizmola.com.
<VirtualHost *:80>
ServerAdmin webmaster@gizmola.com
ServerName tm.gizmola.com
DocumentRoot /var/dev1
ErrorLog logs/dev1-error_log
CustomLog logs/dev1-access_log combined
<Directory /var/dev1>
Options FollowSymLinks
AllowOverride All
</Directory>
</VirtualHost>
You'll need to create the directory where your site will live and set permissions. As this is a development server you don't need to be overly concerned, but it's a good practice to get into to setup a user and group to own the webspace for each virtual host. You can then use your ftp client or scp as the user, in the same way you would for a production or shared hosting server to update the files as you develop your website.
groupadd dev1user
useradd -g dev1user dev1user
passwd dev1user
mkdir /var/dev1
chown -R dev1user:dev1user /var/dev1
Anytime you make a change to the apache configuration files, or the php.ini file, you need to restart apache.
Make sure that you've installed a hosts file entry for your new vhost as described previously.
# Copyright (c) 1993-2006 Microsoft Corp.
#
# This is a sample HOSTS file used by Microsoft TCP/IP for Windows.
#
# This file contains the mappings of IP addresses to host names. Each
# entry should be kept on an individual line. The IP address should
# be placed in the first column followed by the corresponding host name.
# The IP address and the host name should be separated by at least one
# space.
#
# Additionally, comments (such as these) may be inserted on individual
# lines or following the machine name denoted by a '#' symbol.
#
# For example:
#
# 102.54.94.97 rhino.acme.com # source server
# 38.25.63.10 x.acme.com # x client host
127.0.0.1 localhost
::1 localhost
10.1.0.4 dev1.gizmola.com
If all works as planned, the vhost should now answer. Put a phpinfo file (see Part 1 of this series) and point the browser to it to verify everything is working as planned.

Trackbacks
GizmoLA.com on : Run a Centos Lamp development server on XP, Vista or Win 7 using VirtualBox
Show preview
If you use a Windows based workstation or notebook computer virtualization offers a way for you to run a linux server environment using the same linux distribution and configuration you'll use in production. Virtualization allows you to explore clusterin

Comments
Display comments as Linear | Threaded
Best VPS Hosting on :
Note: If you want to launch a LAMP Server on EC2, see All-In-One LAMP Server.